Implementing the Selling Partner API OAuth flow
Before you can list a Selling Partner API application on the Marketplace Appstore, you need to set up an authorization workflow. Here's how.

(You need Selling Partner API credentials to follow along with this post. If you don’t have those credentials, my post How to Access the Amazon Selling Partner API guides you through the process of getting them.)
The Marketplace Appstore is a place where Selling Partner API developers can sell (or give away) tools that they’ve created. In order to list an application on the Appstore, you need to set up Amazon’s authorization flow for your app, so that other sellers can authorize your application on their Seller account. This post is a guide to that process.
There are two slightly different options for setting up the Selling Partner API OAuth flow:
- The Amazon Partner Network workflow: with this method, the Seller starts the authorization process by clicking the
Authorizebutton on your application’s page on the Marketplace Appstore. They are then redirected to your website (where they log in, if applicable). - The website workflow: this method is very similar to the Amazon Partner Network workflow, but the Seller starts on your site instead of on the Marketplace Appstore. They start the authorization process by clicking a button on your website (again, after logging in, if applicable). This is the workflow I cover in this guide—but you can easily modify my code in order to implement the Amazon Partner Network workflow instead.
Let’s get into it!
Prerequisites
You’ll need:
- Git
- PHP
- Composer
- ngrok
- Seller Central developer and application credentials (see the first paragraph of this post if you don’t have these)
Setup
We need a basic web application to get started. To save you the hassle of writing the webapp yourself, I’ve created a template for you to start off the project with. Download it by running git clone git@github.com:jlevers/spapi-oauth-template spapi-oauth && cd spapi-oauth.
The template is the skeleton of a web application, which I built with Slim and the Twig templating engine. I’m not going to explain all the boilerplate, since it’s not directly relevant to this guide—instead, here’s a quick overview of the project structure (with some not-that-important files excluded for clarity):
$ tree
.
├── app
│   └── routes.php  # All the project's routes. This is where the magic happens!
├── .env.example  # Template for environment variables file (.env)
└── public  # Publicly accessible files
├── html
│   ├── authorize.html  # Template for / route
│   └── redirect.html   # Template for /redirect route
├── index.php  # Slim app configuration and startup code
└── style.css  # App styles
Now that you know how the project is laid out, we can finish setting it up.
- Install the project’s dependencies with
composer install - Copy the environment variables template file to the real environment variables file:
cp .env.example .env - Fill in values for the variables in
.env. There are comments in the file that provide some guidance.
Let’s start writing some code!
Initiating the authorization process
As I mentioned in the intro, the authorization process starts with the Seller clicking a button on your website. To that end, the public/html/authorize.html template has a form consisting of a submit button labeled Authorize:[[1]]
<form method="POST" action="{{ current_url() }}">
    <input type="submit" value="Authorize" />
</form>
This very basic form makes a POST request to the URL of the page that the form itself is on. Let’s start by writing the code to serve that form. Open up app/routes.php and add this to the body of the anonymous function there:
/*
 * Display the Authorize page (GET /)
 */
$app->get("/", function(Request $request, Response $response, $args): Response {
    return $this->get("view")->render($response, "authorize.html");
});
This is what a basic route definition looks like in Slim. It tells the Slim $app what to do if someone makes a GET request to the root (/) path of the application: return the rendered authorize.html template.[[2]]
Since the form with the Authorize button submits data to this same route, we also need to tell Slim what to do when there’s a POST request to /. This is where we start getting into the meat of the OAuth flow. I’ll give you the code first, and then explain what it does. Add this after the GET / route:
/*
 * Redirect to the Amazon OAuth application authorization page when users submit
 * the authorization form (POST /)
 */
$app->post("/", function(Request $request, Response $response, $args) use ($DEBUG): Response {
    session_start();
    $state = bin2hex(random_bytes(256));
    $_SESSION["spapi_auth_state"] = $state;
    $_SESSION["spapi_auth_time"] = time();

    $oauthUrl = "https://sellercentral.amazon.com";
    $oauthPath = "/apps/authorize/consent";
    $oauthQueryParams = [
        "application_id" => $_ENV["SPAPI_APP_ID"],
        "state" => $state,
    ];

    if ($DEBUG) {
        $oauthQueryParams["version"] = "beta";
    }

    $uri = new Uri($oauthUrl);
    $uri = $uri->withScheme("https")
               ->withPath($oauthPath);
    $uri = $uri->withQueryValues($uri, $oauthQueryParams);

    $response = $response->withHeader("Referrer-Policy", "no-referrer");
    $response = $response->withHeader("Location", strval($uri));
    return $response;
});
Let’s break this down.
-
Create a
statevalue to send with our authorization request.stateshould be a short-lived, unique token that is associated with the Seller who initiated the authorization process. I’ll explain more about why this is necessary when we get to the/redirectroute a little later. Our state token is a random 256-byte string generated withrandom_bytes(), which is stored in the user session along with a timestamp (which we’ll use to enforce the “short-lived” aspect of the state token). Read Amazon’s description of the state token here.session_start(); $state = bin2hex(random_bytes(256)); $_SESSION["spapi_auth_state"] = $state; $_SESSION["spapi_auth_time"] = time(); -
Construct the Amazon authorization URL to redirect the Seller to. Amazon’s authorization URL is https://sellercentral.amazon.com/apps/authorize/consent, but we need to add some query parameters to it before we send the Seller there:
application_id: your Selling Partner API application ID. You entered this into your.envfile during setup, and we’re passing that value to Amazon via this query parameter.state: the state value that we generated.- If testing an authorization flow, rather than using the flow in production, a third query param/value is required:
version=betaIf theDEBUGvariable in.envis set to true (as it should be during your first time through this guide), this parameter will be added to the URL.
$oauthUrl = "https://sellercentral.amazon.com"; $oauthPath = "/apps/authorize/consent"; $oauthQueryParams = [ "application_id" => $_ENV["SPAPI_APP_ID"], "state" => $state, ]; if ($DEBUG) { $oauthQueryParams["version"] = "beta"; } $uri = new Uri($oauthUrl); $uri = $uri->withScheme("https") ->withPath($oauthPath); $uri = $uri->withQueryValues($uri, $oauthQueryParams); -
Set the
Referrer-Policyheader tono-referrerto prevent CSRF attacks, and then redirect the user to the Amazon authorization URL we just assembled.$response = $response->withHeader("Referrer-Policy", "no-referrer"); $response = $response->withHeader("Location", strval($uri)); return $response;
Now the Seller will be redirected to Amazon to confirm the authorization.
Processing the authorization credentials
Once the Seller confirms with Amazon that they want to authorize our app, Amazon will redirect them back to us at a redirect URL of our choosing…along with some query parameters.
state: the state parameter we passed earlierselling_partner_id: the seller ID of the Seller authorizing the applicationspapi_oauth_code: a code we can use to create an (long-lived) LWA refresh token, which we will in turn use to generate short-lived LWA access tokens.- If your app is a hybrid MWS/SP API application, there will also be an
mws_auth_tokenthat you can use to make calls to MWS. If you’re not sure if this applies to you, it probably doesn’t.
If you’re wondering how we tell Amazon which redirect URL we chose, hang on—I’ll explain that shortly.
We need to do a few different things with the query parameters we receive at our redirect URL:
- Verify that the state value matches the one saved in the user’s session
- Make sure the state value hasn’t expired
- Use the OAuth code to retrieve a refresh token
As before, I’ll give you all the code at once, and then break it down. Add this to app/routes.php, the same way we added the other route functions:
/*
 * When the user approves the application on Amazon's authorization page, they are redirected
 * to the URL specified in the application config on Seller Central. A number of query parameters
 * are passed, including an LWA (Login with Amazon) token which we can use to fetch the  user's
 * SP API refresh token. With that refresh token, we can generate access tokens that enable us to
 * make SP API requests on the user's behalf.
 */
 $app->get("/redirect", function (Request $request, Response $response, $args): Response {
    $queryString = $request->getUri()->getQuery();
    parse_str($queryString, $queryParams);

    $outerThis = $this;
    $render = function($params = []) use ($outerThis, $response) {
        return $outerThis->get("view")->render($response, "redirect.html", $params);
    };

    $missing = [];
    foreach (["state", "spapi_oauth_code", "selling_partner_id"] as $requiredParam) {
        if (!isset($queryParams[$requiredParam])) {
            $missing[] = $requiredParam;
        }
    }
    if (count($missing) > 0) {
        return $render(["err" => true, "missing" => $missing]);
    }

    session_start();
    if (!isset($_SESSION)) {
        return $render(["err" => true, "no_session" => true]);
    }
    if ($queryParams["state"] !== $_SESSION["spapi_auth_state"]) {
        return $render(["err" => true, "invalid_state"]);
    }
    if (time() - $_SESSION["spapi_auth_time"] > 1800) {
        return $render(["err" => true, "expired" => true]);
    }

    [
        "spapi_oauth_code" => $oauthCode,
        "selling_partner_id" => $sellingPartnerId
    ] = $queryParams;

    $client = new GuzzleHttp\Client();
    $res = null;
    try {
        $res = $client->post("https://api.amazon.com/auth/o2/token", [
            GuzzleHttp\RequestOptions::JSON => [
                "grant_type" => "authorization_code",
                "code" => $oauthCode,
                "client_id" => $_ENV["LWA_CLIENT_ID"],
                "client_secret" => $_ENV["LWA_CLIENT_SECRET"],
            ]
        ]);
    } catch (GuzzleHttp\Exception\ClientException $e) {
        $info = json_decode($e->getResponse()->getBody()->getContents(), true);
        if ($info["error"] === "invalid_grant") {
            return $render(["err" => "bad_oauth_token"]);
        } else {
            throw $e;
        }
    }

    $body = json_decode($res->getBody(), true);

    [
        "refresh_token" => $refreshToken,
        "access_token" => $accessToken,
        "expires_in" => $secsTillExpiration,
    ] = $body;

    $config = new SellingPartnerApi\Configuration([
        "lwaClientId" => "<LWA client ID>",
        "lwaClientSecret" => "<LWA client secret>",
        "lwaRefreshToken" => $refreshToken,
        // If you don't pass the lwaAccessToken key/value, the library will automatically generate an access
        // token based on the refresh token above
        "lwaAccessToken" => $accessToken,
        "awsAccessKeyId" => "<AWS access key ID>",
        "awsSecretAccessKey" => "<AWS secret access key>",
        "endpoint" => SellingPartnerApi\Endpoint::NA,
    ]);
    $api = new SellingPartnerApi\Api\SellersV1Api($config);

    $params = $body;
    try {
        $result = $api->getMarketplaceParticipations();
        $params["success"] = true;
    } catch (Exception $e) {
        print_r($e);
    }

    return $render($params);
});
Step by step:
-
Parse the query parameters out of the URL:
$queryString = $request->getUri()->getQuery(); parse_str($queryString, $queryParams); -
Since we need to render the same template in multiple different places in this route, I abstracted that process into a local function:
$outerThis = $this; $render = function($params = []) use ($outerThis, $response) { return $outerThis->get("view")->render($response, "redirect.html", $params); }; -
Make sure that all the query parameters we’re expecting to receive are actually there, and render the page with an error message if any parameters are missing:
$missing = []; foreach (["state", "spapi_oauth_code", "selling_partner_id"] as $requiredParam) { if (!isset($queryParams[$requiredParam])) { $missing[] = $requiredParam; } } if (count($missing) > 0) { return $render(["err" => true, "missing" => $missing]); } -
Compare the
stateURL parameter to the session state, and verify that a) the values match and b) the session state was set in the last 30 minutes (1800 seconds):session_start(); if (!isset($_SESSION)) { return $render(["err" => true, "no_session" => true]); } if ($queryParams["state"] !== $_SESSION["spapi_auth_state"]) { return $render(["err" => true, "invalid_state"]); } if (time() - $_SESSION["spapi_auth_time"] > 1800) { return $render(["err" => true, "expired" => true]); } -
Grab the OAuth code and Selling Partner ID from the query parameters, and use that data to retrieve a refresh token. Amazon’s URL for retrieving authorization tokens is
https://api.amazon.com/auth/o2/token, and we have to POST some data to that URL to get our refresh token. Specifically, we need to tell them what kind of credential we’re providing in order to retrieve the auth token (in this case, the OAuth code, orauthorization_code), as well as provide the OAuth code itself, and our app’s LWA client ID and secret key (which we put in the.envfile earlier). Note that if you don’t use the OAuth code to generate a refresh token within 5 minutes, the OAuth code is no longer valid.[ "spapi_oauth_code" => $oauthCode, "selling_partner_id" => $sellingPartnerId ] = $queryParams; $client = new GuzzleHttp\Client(); $res = null; try { // Try to use the OAuth token to fetch a refresh token $res = $client->post("https://api.amazon.com/auth/o2/token", [ GuzzleHttp\RequestOptions::JSON => [ "grant_type" => "authorization_code", "code" => $oauthCode, "client_id" => $_ENV["LWA_CLIENT_ID"], "client_secret" => $_ENV["LWA_CLIENT_SECRET"], ] ]); } catch (GuzzleHttp\Exception\ClientException $e) { // If the page loads really slowly, or if the page is reloaded after its initial load, // the OAuth token will have expired and the request to fetch a refresh token will fail $info = json_decode($e->getResponse()->getBody()->getContents(), true); if ($info["error"] === "invalid_grant") { return $render(["err" => "bad_oauth_token"]); } else { throw $e; } } $body = json_decode($res->getBody(), true); [ "refresh_token" => $refreshToken, "access_token" => $accessToken, "expires_in" => $secsTillExpiration, ] = $body; -
Make a call to the Selling Partner API to test the new refresh token we retrieved by going through the OAuth flow. The Sellers API requires that you have access to the Selling Partner Insights SP API role, but if you don’t have access to that role, you can replace the
getMarketplaceParticipationscall with a call to any other API endpoint that you do have access to. Fill in the placeholder values in theConfigurationobject with your SP API application (lwaClientId,lwaClientSecret) and AWS IAM user (awsAccessKeyId,awsSecretAccessKey) credentials. If the seller you’re authorizing is from a region other than North America, you’ll need to change theendpointvalue to match the region you’re working with.// Construct a Configuration object using the new refresh token we retrieved $config = new SellingPartnerApi\Configuration([ "lwaClientId" => "<LWA client ID>", "lwaClientSecret" => "<LWA client secret>", "lwaRefreshToken" => $refreshToken, // If you don't pass the lwaAccessToken key/value, the library will automatically generate an access // token based on the refresh token above "lwaAccessToken" => $accessToken, "awsAccessKeyId" => "<AWS access key ID>", "awsSecretAccessKey" => "<AWS secret access key>", "endpoint" => SellingPartnerApi\Endpoint::NA, ]); // Create a new SellersApi instance with the above config $api = new SellingPartnerApi\Api\SellersV1Api($config); $params = $body; try { // Call the Selling Partner API $result = $api->getMarketplaceParticipations(); $params["success"] = true; } catch (Exception $e) { print_r($e); } // Render the success page return $render($params);
With that route complete, we’re ready to start testing.
Test it out!
To try out the authorization process, run the application on your local machine with PHP’s built-in webserver:[[3]]
$ cd public
$ php -S localhost:4000
There’s one last piece of setup—for security purposes, Amazon requires you to specify your authorization URL (where users start the authorization process) and your redirect URL (where users are sent once authorization is complete) in your SP API application config. Since we’re running this workflow locally, we want the URLs in the application config to correspond to URLs on our local machine…but Amazon will have no idea what we’re talking about if we put something like http://localhost:4000 in there. That’s what ngrok is for—it allows us to expose our local URLs to the wider internet.
Open a new terminal and run ngrok http 4000. Then, put https://<YOUR NGROK URL> in the OAuth Login URI field for your app, and https://<YOUR NGROK URL>/redirect in the OAuth Redirect URI field. For me, that looked like this (your ngrok URL will be different):
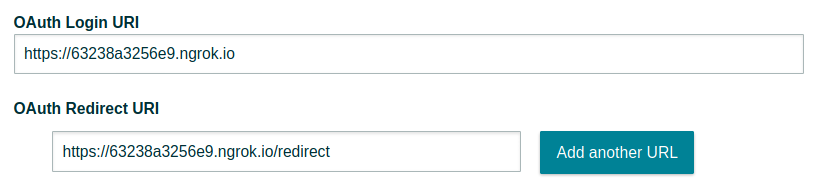
Make sure to save the application config when you’re done.[[4]]
At long last, you can try out your authorization flow. Go to your ngrok URL (in my case, https://63238a3256e9.ngrok.io, but yours will be different) and click the Authorize button.[[5]] You will taken to Amazon’s authorization page, and after confirming the authorization with them, you should land back on https://<YOUR NGROK URL>/redirect.[[6]] On that page, you should see the credentials you need to make requests to the Selling Partner API as the Seller who just authorized your application (which in this case, is you). At the bottom of the page you should see Selling Partner API call: success, indicating that the new refresh token was used to make a call to the SP API, to check that it actually worked.
That should be everything you need to implement your own Selling Partner API OAuth workflow. If you have any questions or comments on this post, please feel free to email me! I’d love to hear from you.
(I help Amazon sellers optimize and automate business processes using the Selling Partner API—if you’re interested in upgrading the tools you use to sell on Amazon, shoot me an email at jesse@jesseevers.com.)
[[1]]: If action="{{ current_url() }}" looks a little foreign, that’s because it’s a Twig template tag. Twig substitutes the URL of the current page in for {{ current_url() }} before the page is rendered.
[[2]]: The configuration code that connects the Twig rendering engine to the Slim $app is in public/index.php.
[[3]]: This built-in webserver is not meant for production applications. Make sure to always use a full-featured webserver like Apache or Nginx when you go live with your application.
[[4]]: This part of the application configuration form is strange—if you enter only one of the authorization and redirect URLs but not both, or if one of the URLs is invalid, neither URL will be saved when you click Save and exit, and no error will be shown.
[[5]]: You need to start the authorization flow from the ngrok URL, not the equivalent localhost URL (localhost:4000), because the authorization state value is stored as session data. Session data is associated with a domain, so if you start the authorization flow from localhost:4000, the state value will be associated with that domain…and when Amazon redirects you back to your ngrok redirect URL, the state value will not be retrievable (since you’re now on a different domain). This isn’t an issue on production, because on production there won’t be two different domain names pointed to the same content.
[[6]]: At the time of writing (February 2021), Amazon’s authorization confirmation page has a bug that causes every place where your app name should be to say Fixed.null.